
Low voltage step lights usually stop working because power is lost before the fixture, the local splice has failed, or moisture has reached the fixture lead.
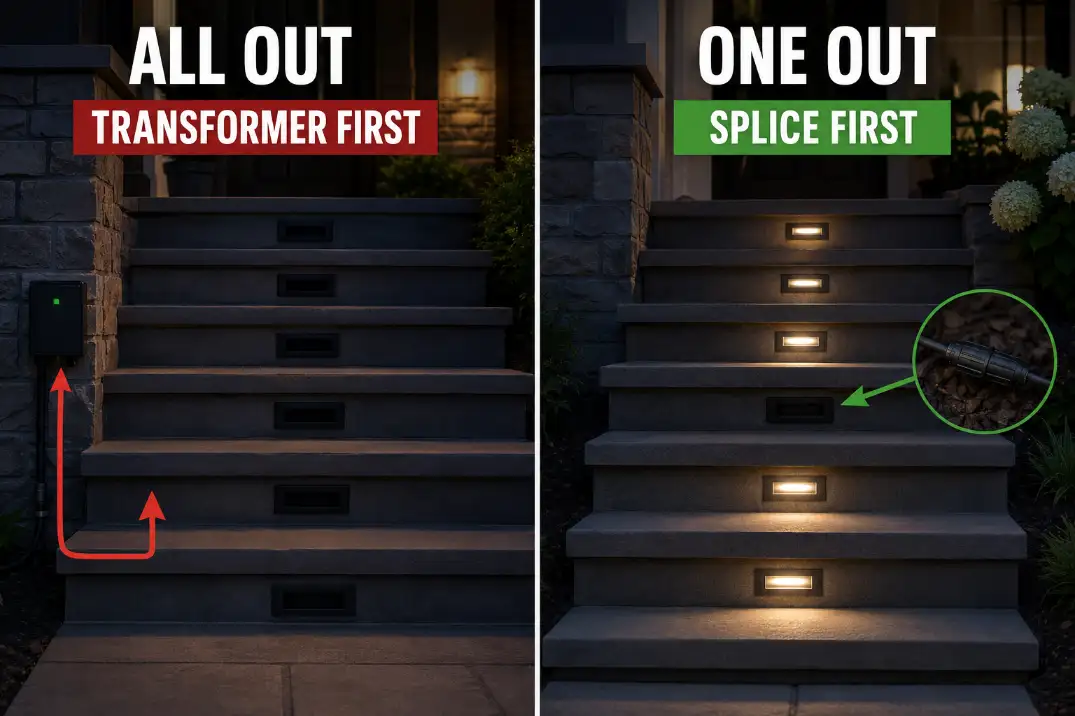
If every step light is out, start at the transformer, outlet, timer, photocell, GFCI, and main cable. If only one light is out, the problem is more likely at that fixture, its splice, or its short lead wire.
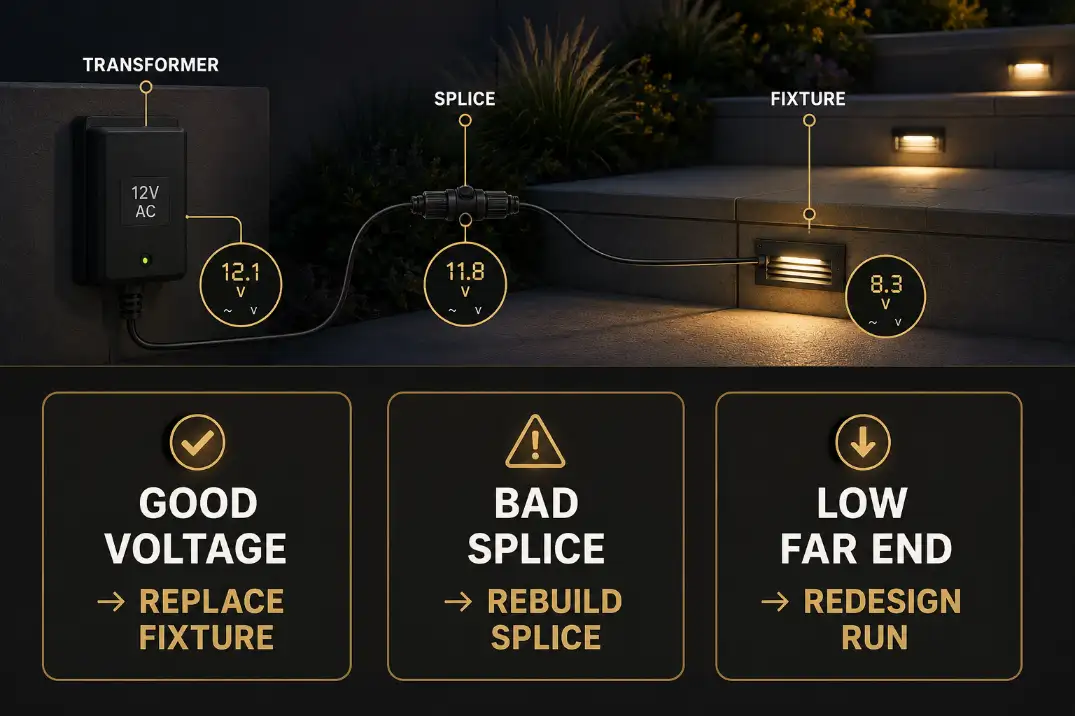
A healthy 12-volt step light circuit often reads roughly 11–12 volts at the fixture under load, depending on transformer tap, cable length, and fixture rating.
If the fixture receives under about 10 volts while nearby lights still work, voltage drop or a weak connection deserves more suspicion than the LED itself. If the failure appears 12–48 hours after rain, irrigation, or freeze-thaw movement, moisture should move near the top of the list.
Do not replace the step light first unless voltage and the local splice have already been proven good.
Quick Answer: What to Check First
A single dead step light usually points to the local splice, fixture lead, or fixture body; a whole dark group points to transformer output, controls, GFCI, or the main cable.
If all low voltage step lights are out, check the transformer output, GFCI, timer, photocell, and main cable before opening individual fixtures.
If one step light is out while nearby lights work, test the local splice and fixture lead first.
If the farthest step lights are dim, compare voltage at the first and last fixtures. A drop of more than about 1.5–2 volts across the run is a strong sign of voltage loss.
If the lights fail after rain or sprinklers run, inspect water entry around the faceplate, cable entry, fixture cavity, and splice.
Start With the Pattern, Not the Fixture
Step lights are small, so people often assume the small part failed. That is not always the smartest first move. The fixture is only the visible endpoint of a longer path: transformer, control device, cable, splice, fixture lead, internal driver, and LED module.
This is the same basic failure chain behind Low Voltage Landscape Lighting Problems, but step lights add two extra complications: they are often recessed into risers or hardscape, and their splices may be hidden behind trim, under deck boards, or inside damp masonry cavities.
Confirm It Is Really Low Voltage
Before handling the fixture like a landscape light, confirm what type of system you are working on. Many outdoor step lights are 12-volt low voltage fixtures, but some stair, deck, and masonry lights are line-voltage fixtures connected to household wiring.
If you see a 120V label, a metal junction box, a ground wire, conduit, or standard household cable, stop treating the fixture as a simple low-voltage landscape light. The 120-volt side belongs to a qualified electrician. Low voltage troubleshooting should stay on the transformer output, low-voltage cable, and fixture leads.
If Every Step Light Is Out
When the whole step-light group is dark, do not start by replacing fixtures. Check the transformer first. Confirm that the outlet has power, the GFCI has not tripped, the timer is not in the wrong mode, and the photocell is not being fooled by nearby light.
Then test the transformer output at the low-voltage terminals. A 12-volt tap may read slightly above 12 volts with little load attached, while a loaded circuit should stay within the fixture’s rated operating range. If there is no low-voltage output at the transformer, the problem is upstream of the step lights.
If Only One or Two Step Lights Are Out
When nearby step lights still work, the transformer is probably not the main failure. The likely suspects narrow quickly: a loose splice, damaged fixture lead, corroded connector, trapped water, incompatible fixture, or failed LED module.
This distinction matters because replacing one fixture without checking the splice can waste money. A new step light connected to the same wet or loose splice may work for one evening and fail again after the next rain.
Follow the Power Before You Replace the Light
A useful diagnosis follows the power path in order. Randomly changing parts creates false confidence because low voltage systems can briefly recover when wires are moved.
Test in This Order
First, test transformer output. Second, test the first working step light. Third, test the dead fixture leads. Fourth, test the last fixture on the run. Finally, compare readings before replacing parts.
That sequence tells you whether the problem begins at the transformer, appears between fixtures, or sits inside one fixture. It also prevents the common mistake of replacing a good light on a bad splice.
Check the Control Side First
Before opening step lights, check the transformer schedule, timer setting, photocell behavior, and breaker or GFCI status. A step-light run that works in test mode but not after dark may have a control problem rather than a wiring failure.
If the transformer clicks on and then shuts off within a few minutes, overload, shorting, or a failing transformer becomes more likely. In that case, Transformer Problems in Low Voltage Systems is the more useful diagnostic path than replacing step lights one by one.
Test Voltage Under Load
Voltage readings are more useful when the lights are connected and operating. A cable can show voltage with no load but collapse when the fixtures draw power.
As a practical guide, one working step light near the transformer and one dim or dead light farther away suggests voltage drop or connection resistance.
A difference of more than about 1.5–2 volts between the first and last fixture on the same run is a strong clue that cable length, wire size, splice quality, or fixture count is part of the problem.
Pro Tip: Measure at the fixture lead, not only at the transformer. Good transformer output does not prove the step light is receiving usable power.
Confirm AC/DC and Fixture Compatibility
Good voltage does not always mean the fixture is compatible. Some low voltage LED step lights are rated for 12V AC, some for 12V DC, and some for 24V DC. A landscape transformer may power one fixture type correctly and still be wrong for another.
Wrong AC/DC matching can cause no-start, flickering, buzzing, repeated shutoff, or early LED failure. If a new step light never worked properly, verify the fixture label and transformer output before blaming the wiring.
Inspect the Splice Before Blaming the LED
Step lights often fail at the connection before the LED itself fails. The splice may be tucked into a riser cavity, behind a trim board, under a deck edge, or in soil near the stair base.
If that connection was made with a basic twist connector instead of a waterproof outdoor-rated connector, corrosion can build slowly until the light flickers, dims, or dies.
That is why Corroded Wire Splices Outdoors is often more relevant than the fixture brand when the failure is intermittent, touch-sensitive, or rain-related.
Quick Diagnostic Checklist
| Failure pattern | Check first | What it usually means |
|---|---|---|
| All step lights are out | Transformer or control side | No output, wrong timer mode, tripped GFCI, failed transformer |
| One step light is out | Fixture lead or splice | Local connection failure, water entry, bad LED module |
| Last lights are dim | Cable run or load | Voltage drop, undersized wire, too many fixtures |
| Correct voltage, no light | Fixture compatibility or internal failure | Wrong AC/DC type, failed driver, sealed LED failure |
| Works after reset, fails again | Short or moisture | Water intrusion, damaged wire, overloaded transformer |
| Fails after rain or sprinklers | Fixture or splice sealing | Water has reached the electrical path |
| Flickers when touched | Connection point | Loose splice, broken conductor, weak fixture lead |
Why Step Lights Are More Moisture-Prone Than Path Lights
Step lights sit in places where water collects, drains, splashes, or freezes. A path light may shed water around a stake, but a recessed step light can trap moisture behind the faceplate or around the cable entry.
On masonry steps, water can wick into small gaps. On deck stairs, wet leaves and debris can hold moisture against the fixture for days.
A light that fails 12–48 hours after heavy rain is usually telling you something different from a light that never turns on at all. Delayed failure points toward moisture migration, not just a dead LED.
In humid Florida yards or coastal California homes, corrosion can advance faster because damp air and salt exposure keep metal parts from drying cleanly. In northern states, freeze-thaw cycles can open small gaps around a fixture faceplate, letting water enter even if the light looked sealed in fall.

Condensation Is Not Always the Same as Failure
A little fogging behind a lens can appear after a temperature swing, especially when warm moist air cools overnight. That alone does not prove the fixture is dead.
The decision-useful sign is whether water reaches the electrical parts, leaves mineral marks, corrodes contacts, or repeats after every storm.
When Water in Outdoor Step Lights matches the pattern, the diagnostic focus should shift from surface cleaning to the faceplate seal, cable entry, fixture cavity, and splice.
Sprinklers Are Often Underestimated
Readers often overestimate rain and underestimate irrigation. A sprinkler head hitting the same step light for 10–20 minutes several times a week can be harder on a fixture than occasional rainfall.
The spray angle matters too: water hitting from below or sideways can reach cable entries and faceplate seams that normal rain may miss.
If the failure sits on one side of the stairs near a spray zone, adjust the irrigation before replacing the same fixture again.
When Voltage Drop Is the Real Problem
Voltage drop is not just a “long run” issue. It can come from cable length, wire gauge, fixture count, poor splices, or a daisy-chain layout that asks the last lights to live on whatever voltage remains.
The common misread is treating dim step lights as weak LEDs. If the first two lights are normal and the last three fade, the symptom is dim output, but the mechanism is power loss along the run.
A Small Run Can Still Be Weak
Step-light runs often look short because the lights are close together. But the cable route may travel from a transformer around a house corner, under a deck, across a landing, and then down the stairs. A visible 12-foot stair section can be part of a 60- or 80-foot electrical path.
If wire size is too small for the distance and fixture load, the last lights may be dim even though nothing is “broken.” For fixture groups added after the original installation, Low Voltage Landscape Lighting Wire Gauge is often the smarter next check.
Daisy Chains Make the Last Step Vulnerable
A daisy chain is not automatically wrong, but it gives the last fixtures the least margin. Each splice, foot of cable, and added fixture increases the chance that the far end receives weaker voltage.
If the last light is always the first to dim or fail, do not keep replacing that far fixture without checking the feed layout.
The broader mechanics in Voltage Drop in Outdoor Lighting Systems matter here because the same transformer can produce very different results at the first and last fixtures on a step-light run.
Repair the Part the Test Actually Points To
The best repair depends on what the pattern proved. Do not reseal, replace, and rewire at the same time unless the installation is clearly failing in multiple places. Change one meaningful layer, then test.
If There Is No Transformer Output
Reset the GFCI, check the outlet, confirm timer and photocell settings, then test the transformer terminals. If output is still missing, the transformer or control device may need service or replacement. Do not open the 120-volt supply side unless you are qualified to do so.
If Voltage Reaches the Fixture
If usable voltage reaches the fixture but the light stays dark, inspect the fixture lead, socket, LED module, and internal driver if accessible. For sealed LED step lights, the practical repair may be replacement once the connection, voltage, and AC/DC compatibility have been proven good.
This is where routine fixes stop making sense: if a sealed fixture has water marks inside the lens, repeated internal condensation, or a dead LED despite proper voltage, cleaning the faceplate will not restore the electrical parts.
If Voltage Disappears Between Fixtures
Open the last known working connection and the first failed connection. Look for green or white corrosion, brittle insulation, pulled conductors, loose wire nuts, or water-filled connectors. Replace failed connectors with outdoor-rated waterproof splices and keep them out of standing water whenever possible.
If the Run Is Underpowered
Move from repair to redesign when the numbers point to system weakness. If the far fixtures are consistently more than about 1.5–2 volts lower than the near fixtures, or if added step lights made the whole run dimmer, a larger wire gauge, shorter feed, hub-style split, or higher transformer tap may be needed within the fixture’s rated range.
Do Not Replace Anything Until These Are Checked
Do not replace the fixture yet if you have not tested voltage at the fixture leads. A dead-looking light may simply be disconnected from usable power.
Do not replace the transformer yet if only one step light is out. One wet splice or failed fixture can make the problem look larger than it is.
Do not assume the LED failed if the problem appeared after rain, sprinklers, or freeze-thaw movement. Open the local connection first.
Do not keep installing the same replacement light if the far end of the run is always weak. That points to layout, wire size, or voltage drop, not repeated bad luck.
When to Stop Troubleshooting and Replace Parts
A step light is worth replacing when it has confirmed compatible voltage, clean new connections, no control-side issue, and still will not turn on. It is also worth replacing when water has reached sealed internal parts that cannot be dried, cleaned, or serviced.
A splice is worth rebuilding when movement, rain, or touch changes the light’s behavior. A transformer deserves attention when multiple lighting zones fail, the system shuts off after a few minutes, or output is missing even after the outlet and timer are verified.
Call an electrician if the fixture appears to be line voltage, the GFCI trips repeatedly, the transformer supply side is suspect, wiring smells burnt, or you find household-voltage cable where you expected low-voltage landscape wire.
The repair order should be: prove power, prove compatibility, prove the local connection, prove fixture condition, then redesign only if the whole run is underperforming. That sequence prevents the two most common wastes: replacing a good step light on a bad splice, or replacing a transformer when one wet fixture is shorting the run.
Questions People Usually Ask
Can one bad step light make others stop working?
Yes, especially if the bad fixture or splice creates a short or overload that causes the transformer to shut down. If the transformer resets and then fails again after a few minutes, disconnecting the suspect fixture can help isolate the fault.
Why do my step lights work in test mode but not at night?
That often points to timer, photocell, or control settings rather than bad fixtures. A nearby porch light, wall light, or reflective surface can also fool a photocell into thinking it is still daytime.
Can the wrong transformer make a new step light fail?
Yes. A fixture rated for 12V DC may not behave correctly on a 12V AC transformer, and a 24V fixture will not perform correctly on a 12V system. Match the fixture rating to the transformer output before assuming the new light is defective.
Should I replace all step lights if one fails?
Not automatically. Replace all only when several fixtures show the same age-related damage, water entry, or color/output mismatch. If one isolated light is dead, diagnose that fixture and splice first.
Because wet outdoor circuits raise the stakes beyond a simple lighting repair, compare your setup with CPSC electrical safety guidance.