
Fence lights usually shine the wrong way because the fixture is lighting the fence surface, the neighbor side, or the air above the rail instead of the ground you actually need to see.
The first check is direction, not brightness. Stand 20–30 feet away about 30 minutes after sunset and look from normal eye height, around 5–6 feet. If you can see the bulb, LED chip, or bright lens from that distance, the fixture is already creating glare.
This is different from a simple “too bright” problem. A low-lumen fence light can still bother someone if the source points sideways, while a slightly brighter shielded fixture can behave better because it sends light down.
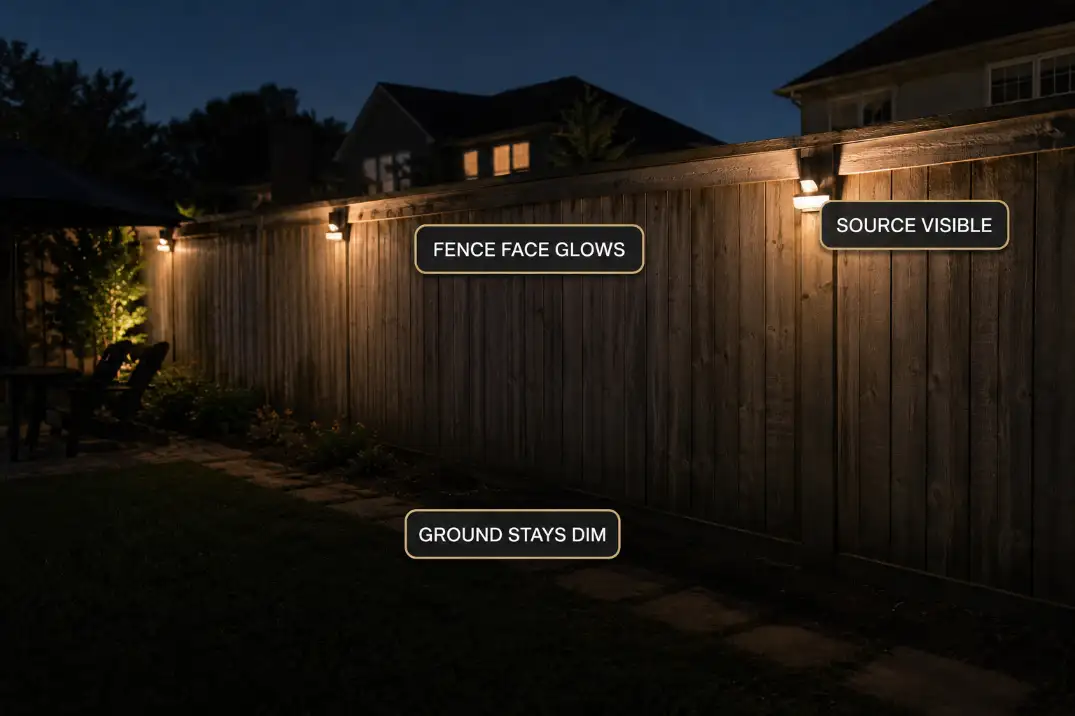
The practical threshold is simple: if the fence face glows more than the path, gate latch, or 12–24 inch strip below it, the wrong surface is being lit.
Upward Glow
The first visible clue is usually above the rail
Upward glow shows up as a bright cap on the top rail, a halo above the fence, or a pale vertical wash that can be seen from outside the yard.
That glow rarely helps navigation. It usually means the fixture has an open top, a clear lens, an exposed decorative bulb, or a cap-light design that spreads light in more directions than the fence line needs.
The useful zone is much lower. Most fence lights should help with a gate latch, a walking edge, a step, or a narrow strip near the fence base.
If the brightest part of the scene sits 4–6 feet above the ground, the light is mostly creating contrast, not safety.
Lower wattage does not fix the beam path
The fix people reach for first is a weaker bulb. Sometimes that reduces the complaint, but it does not change the direction.
A dim open-top fixture still sends light upward. A dim exposed bulb is still exposed. A softer version of the same wrong pattern is not the same as a controlled fence light.
This is why fence glow should be judged by where the beam lands, not by how powerful the lamp claims to be.
The same mistake appears when backyard lighting crosses a property edge instead of staying inside the useful target zone; Backyard Lights Cross Property Line fits that boundary-side version of the problem more tightly.
Neighbor Side Spill
The fence line is not the target zone
Neighbor side spill happens when the fixture sits on your side but the light crosses the boundary. This often shows up on shared fences, side yards, and back corners where a neighbor window or patio faces the same line.
From your patio, the fence may look brighter. From the other side, the source may look like a small glare point or a glowing panel.
The better test is not “Does my yard look lit?” It is “Where does the light stop?” After your eyes adjust for about 10 minutes, walk along the fence and look from the side angle.
Then check from the gate line or the direction of the nearest neighbor window. If the beam is visible beyond the fence plane, the light is leaving the job area.
Small aim errors matter on a shared boundary
Fence lights do not need a huge mistake to become annoying. In a narrow side yard, a 15-degree aim error can move the brightest part of the beam from the ground strip to the fence top or neighbor-facing panel.
That is why shared fence lighting should be treated more like privacy lighting than decoration.
A fixture can be technically mounted on your property and still behave badly if the output is aimed across the boundary.
For the broader version of this problem, Shared Fence Outdoor Lighting Privacy is the closer companion issue because it focuses on how lighting changes the feel of a fence line at night.
Quick diagnostic checklist
- Bulb or LED chip visible from 20–30 feet away
- Top rail glows brighter than the path below
- Fence panel is brighter than the gate latch or walking edge
- Neighbor-facing side catches direct light
- The fixture still looks harsh after 10 minutes of eye adjustment
- A phone photo shows a bright source instead of an evenly lit surface
Pro Tip: Test fence lights from the angle someone else would actually see them, not only from your favorite patio seat.
Bulb Exposure
A small visible LED can feel harsher than a larger shielded light
Bulb exposure is the most underestimated fence-light problem. People often assume the fixture is fine because it is small or low wattage. But the eye reacts strongly to a concentrated bright point, especially in a dark backyard.
A visible LED chip, clear bulb, or bare lens can become the brightest object in the scene even when the fixture is not powerful.
That is the difference between useful light and visible source glare. A good fence light lets you see the latch, step, or edge without staring into the emitter. A bad one makes the light itself the thing your eye keeps finding.
The same source-visibility problem shows up across outdoor fixtures, not just fences. Why Outdoor Lights Create Glare explains why the perceived harshness often comes from contrast and exposed source angle more than raw brightness.
Frosted lenses soften glare but do not control direction
A frosted lens can make a visible bulb less sharp, but it does not automatically make the fixture neighbor-friendly. If the lens still faces outward, the glare may become a larger glowing patch instead of a smaller bright point.
That can feel more comfortable up close while still being visible from a bedroom window or adjacent patio.
This is the point where a routine fix stops making sense. If the source is still visible from 20–30 feet after aiming, dimming or frosting is not the real fix. The fixture type is wrong for that fence location.
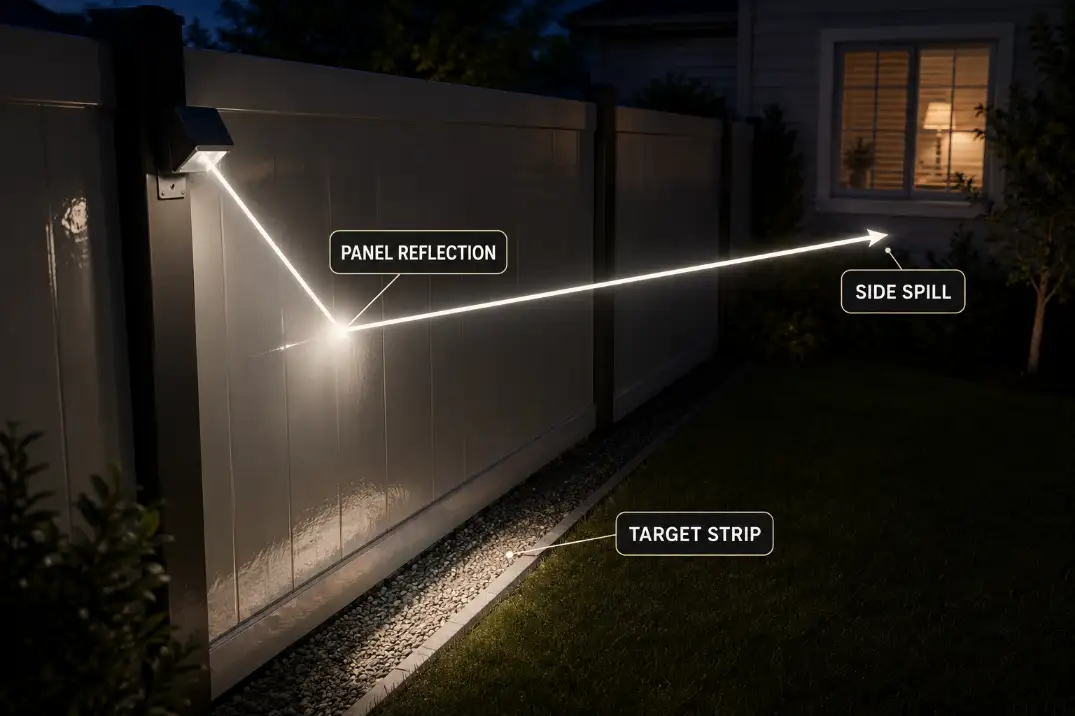
Panel Reflection
The fence can become the reflector
Panel reflection is easy to miss because the fixture may look properly aimed. The problem starts after the beam hits the fence surface.
White vinyl, glossy paint, sealed wood, metal caps, and wet panels can bounce light sideways after the fixture sends it out.
This is why a fence light can look acceptable on a dry evening but feel harsher after rain, sprinklers, or heavy humidity. A wet or glossy panel may reflect noticeably for 1–3 hours after moisture hits it.
In humid Florida-style evenings or rainy Midwest periods, that sheen can last long enough to change the whole night view. In dry Arizona yards, reflection is more often caused by pale surfaces and direct beam angle than lingering moisture.
| Fence condition | Healthier sign | Failing sign | Better response |
|---|---|---|---|
| Matte wood | Soft low wash | Bright top rail | Lower and shield the source |
| White vinyl | Ground stays brighter | Whole panel glows | Use narrower downward output |
| Wet painted fence | Short mild sheen | Side spill for 1–3 hours | Reduce panel hit angle |
| Metal post or cap | Small highlight | Sharp reflected streak | Move fixture or add hood |
| Dark stained fence | Low surface glare | Bulb dominates the scene | Hide the source first |
If the reflected patch is larger than the task area, you are not lighting the fence line anymore. You are creating a bright vertical surface.
That matters near neighbor windows because the glass may receive reflected light even when the fixture is not aimed directly at the window.
This is also where people often misread the symptom. The glowing panel is the symptom. The underlying mechanism is the beam hitting the wrong surface at the wrong angle.
For a window-specific version of the same spill path, Stop Outdoor Lights From Shining Into Neighbor Windows fits naturally with this diagnosis.
Downward Aim
The correct aim is usually less dramatic than people expect
A good fence light should look controlled, almost boring. The beam should land below the fixture, not across the yard and not above the fence rail.
For many residential fence runs, the useful target is a narrow 12–24 inch strip near the fence base or the small working area around a gate.
Mount height changes the risk. A light mounted near the top of a 6-foot fence has more opportunity to be seen from outside the yard.
A lower shielded fixture can often do the same job with less spill because the light does not need to travel as far. A good night test is simple: from normal standing height, the ground strip should read brighter than the fence face.
Aim only works when the fixture can be controlled
Re-aiming makes sense when the fixture has an adjustable head, a hooded face, or a clear downward beam. It stops making sense when the fixture is decorative in every direction.
A clear globe, open cap, or exposed-bulb sconce may not have enough control to become a good fence light no matter how carefully it is adjusted.
This is where readers commonly overestimate dimming. Dimming can reduce intensity, but it cannot turn a sideways source into a downward cutoff fixture. Direction first, output second.
Better Fence Fixtures
Choose the fixture shape before choosing the brightness
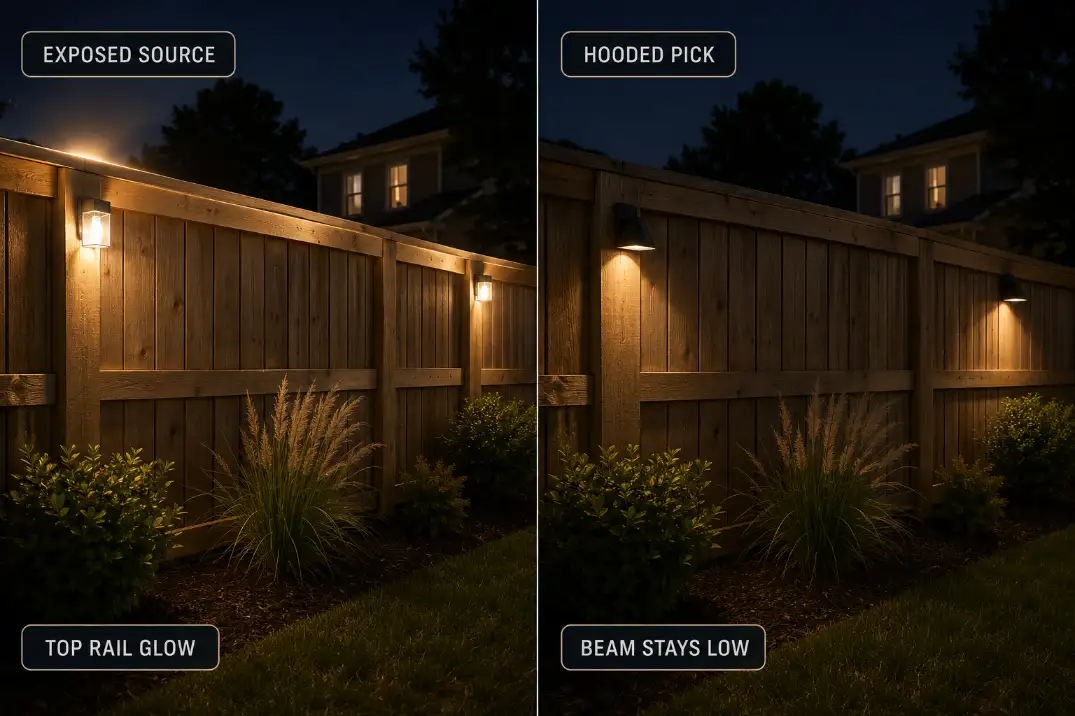
The safer fence fixture is the one that hides the light source and sends light down. For neighbor-sensitive areas, that usually means hooded, louvered, recessed, or full-cutoff designs instead of clear globes, exposed decorative bulbs, or open-top cap lights.
Warm color temperature helps too. A 2700K–3000K light usually looks calmer on fences than cool blue-white light, especially on pale vinyl or painted panels.
Spacing should be restrained. More lights do not automatically improve visibility. On many fence runs, fixtures spaced 6–8 feet apart can already feel busy if each one creates a visible source. Wider spacing with better cutoff often looks calmer than a row of small glare points.
If this is turning into a replacement decision, the product label matters less than the beam behavior.
Look for hidden emitters, controlled downward output, and warm light before comparing designs in Best Neighbor-Friendly Outdoor Lights.
Fixture types that deserve different treatment
Fence cap lights are decorative first and should be checked carefully for upward glow. Clear-lens sconces are risky when the bulb is visible from the side.
Mini flood or security-style heads can work only if they aim sharply down and inward. Recessed or louvered lights are often better for narrow fence runs because they keep the source out of direct view.
Security-style fixtures need the strictest boundary test because they are often brighter and more directional.
If the goal is to replace an exposed fence-mounted security head, Best Low-Glare Outdoor Security Lights is the better buying comparison because the key feature is controlled output, not just more brightness.
What to replace first
Replace the fixture before the bulb when the source remains visible from eye level, the top rail keeps glowing, or the neighbor-facing side is still brighter than the ground.
Replace open-top cap lights when the upward glow is the main problem. Replace clear-lens decorative fixtures when the bulb is the brightest object.
Replace mini flood-style fence lights when the beam keeps crossing the property line after aiming.
The strongest correction is usually not to make the fence brighter. It is to make the light less visible from the wrong side. Once the source is hidden and the beam stays below the fence top, then you can decide whether the path needs more light.
For broader official guidance on shielded outdoor lighting, see the National Park Service Outdoor Lighting Principles.