
Floodlights usually wash out camera footage because the camera reacts to the brightest part of the scene, not the part you need to identify.
A yard can look bright from the house while the recorded clip loses the person, face, gate movement, or walkway edge that made the camera useful.
Start with one simple distinction: if the clip starts on time but the person is dark, the stronger suspect is lighting geometry.
If the person appears late or halfway through the frame, the stronger suspect is motion delay or detection range. A person who is unreadable at about 6–10 feet from the camera while the fence, driveway, or siding behind them looks bright is usually not a camera-resolution problem.
The fix is rarely “add more light.” It is usually to remove the hot spot, lower the beam, keep the lamp face out of the camera view, and add softer light across the approach zone.
Why Bright Floodlights Can Make Camera Footage Worse
The camera protects the bright area first
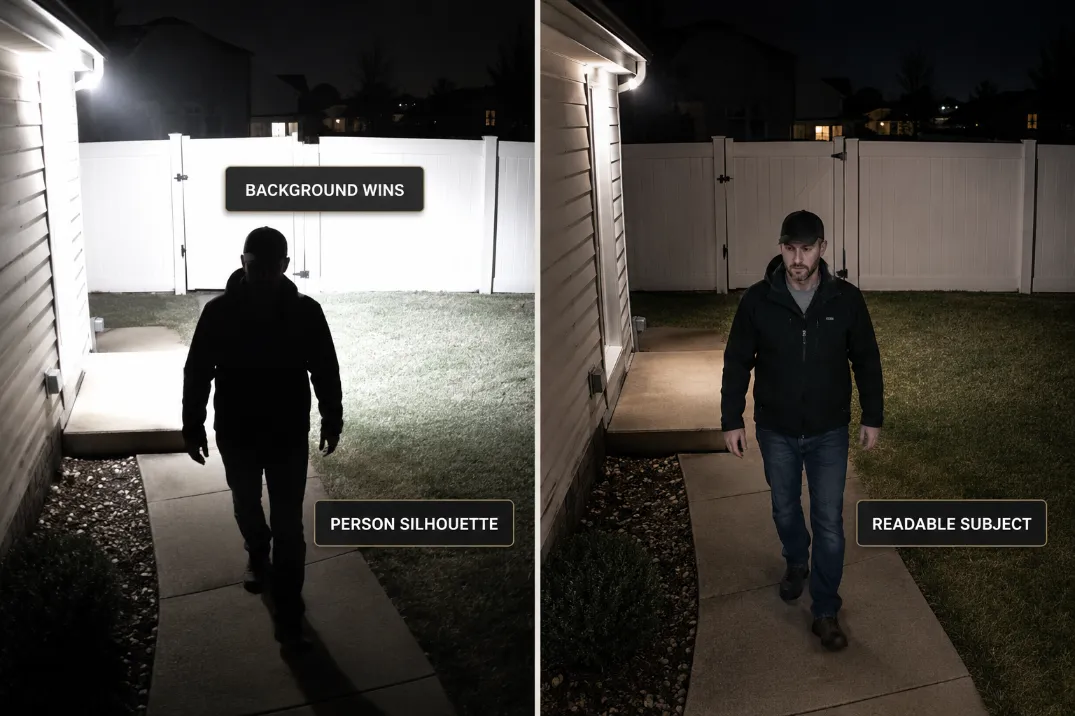
Most outdoor security cameras automatically adjust exposure. When a floodlight creates a bright patch on siding, pavement, a fence, or wet concrete, the camera darkens the whole image to keep that bright area from blowing out completely. That is when the person in the foreground turns into a silhouette.
This is different from a dark-yard problem. In a dark-yard problem, the camera cannot gather enough useful detail anywhere. In a floodlight washout problem, there is plenty of light, but it lands in the wrong place.
A quick test is to pause a 10–15 second night clip and compare the brightest surface with the person’s face or upper body.
If the fence, garage door, or patio slab is clear while the person is unreadable, the floodlight is giving the camera the wrong priority.
Camera settings cannot rescue bad geometry
HDR, WDR, night mode, exposure compensation, and spotlight settings can help after the light is controlled. They should not be treated as the first fix.
If the floodlight source is visible in the frame or the brightest reflection is directly behind the person, settings may only make the failure look slightly cleaner.
A higher-resolution camera can sharpen a silhouette, but it cannot restore detail that the exposure has already crushed.
If your setup already has cameras and the issue is direct light entering the lens, the related failure pattern is covered in Outdoor Lights That Ruin Security Cameras.
The Overexposed Yard Signal
Bright does not mean useful
A useful camera scene has controlled contrast. A failing scene often has one area that is much brighter than everything else. The yard may feel safer because it looks bright in person, but the footage is doing something different: compressing detail.
The first thing to check is not how bright the yard feels. It is whether the person, vehicle, gate, or walkway edge remains readable during the first 3–5 seconds of movement.
If the clip starts with a white-hot patio slab and a dark figure crossing it, the camera is not short on light. It is being forced to expose for the wrong surface.
This is why floodlights can create the same practical result as darkness. The symptom is different, but the outcome is similar: the footage does not show what happened clearly enough.
Wet surfaces raise the failure risk
After rain, concrete, pavers, vinyl fencing, painted siding, and glossy vehicles can bounce more light back into the lens.
A scene that looks acceptable on a dry night can become washed out after 20 minutes of rain because reflective surfaces start acting like secondary light sources.
This is common around driveways and side yards where a floodlight hits pavement at a shallow angle. In that case, lowering the beam a few degrees may help more than changing the bulb.
The condition homeowners often overestimate is total brightness. The condition they often underestimate is reflection.
A 2,000–3,000 lumen floodlight hitting wet concrete can create worse footage than a lower-output fixture aimed across the person’s approach path.
Bright Background, Person Silhouette
The subject needs front or side detail
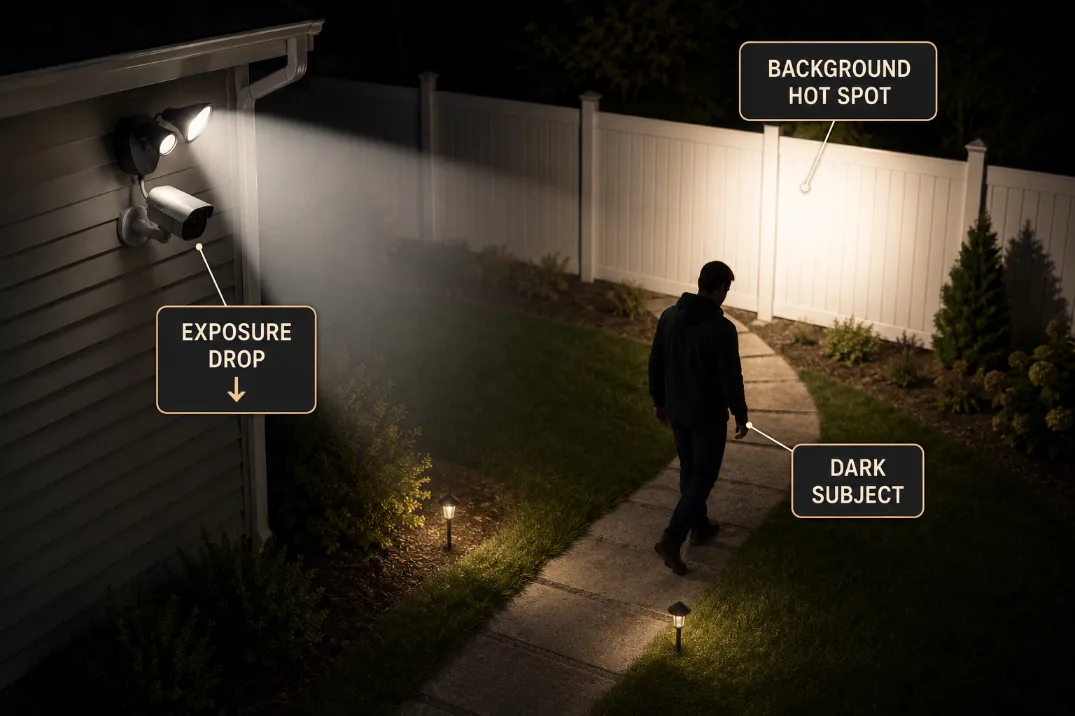
A camera does not need the entire yard lit evenly. It needs enough detail on the side of the person facing the lens. If the floodlight sits behind the person’s route, the person may block the light and become a dark shape against a bright background.
The healthier setup is usually softer side-fill or downward light across the approach zone. The failing setup is a wide rear wash that lights the fence, garage door, or lawn behind the person.
A practical test is simple: stand where a visitor, delivery driver, or intruder would pass and record a 10-second clip. If your face or upper body is unreadable at 6–8 feet but the background is bright, move the light before replacing the camera.
Infrared glare is a different look
Floodlight washout usually shows a bright background with a dark subject. Infrared glare usually looks more like white haze, close reflection, or a foggy bloom near the lens. That can happen when IR bounces off a wall, soffit, glass, spider web, or nearby trim.
The distinction matters because the fixes are different. Floodlight washout is usually solved by beam aim, softer fill, or fixture shielding.
IR reflection may require moving the camera, cleaning the lens area, disabling IR, or avoiding nearby reflective surfaces.
If the bigger issue is that strong floodlights create hidden dark zones beside the bright area, Floodlights Create Blind Spots is the closer diagnosis.
Wide Beam Problems
The beam is too broad for the camera’s job
Wide floodlights are designed to cover area. Cameras need readable targets. Those goals can conflict when one beam covers the lawn, fence, driveway, garage wall, and person path at the same time.
A 120-degree beam can look impressive from the patio, but it may give the camera too much brightness outside the target zone. For camera support, a narrower, lower, or better-shielded beam often works better than a larger light head.
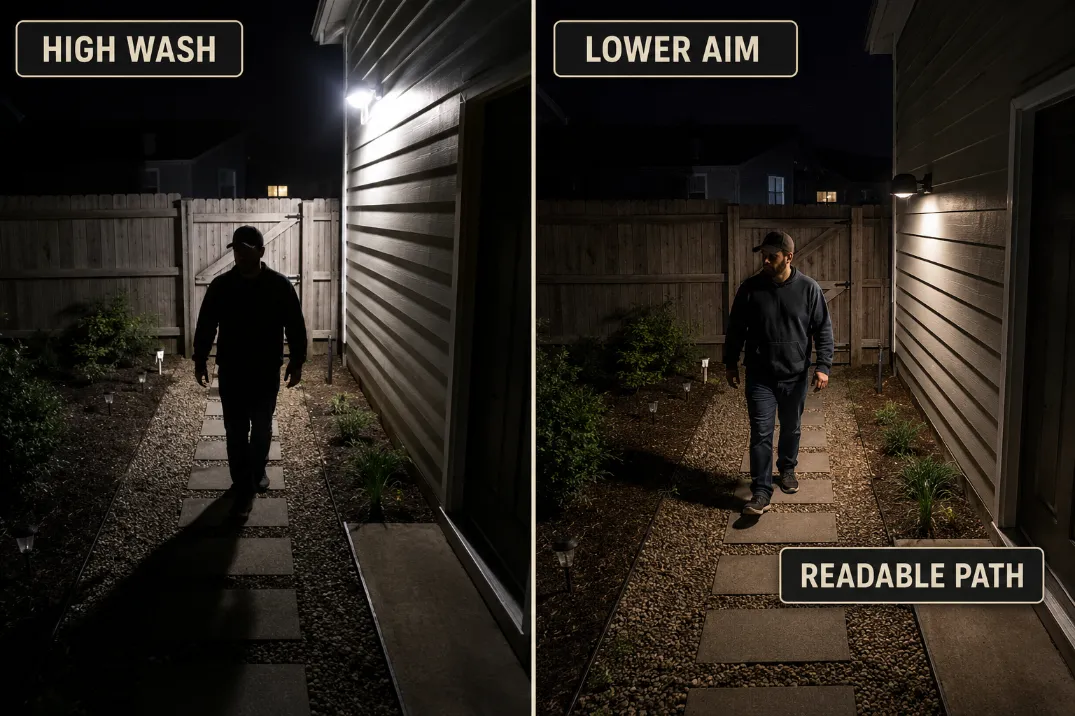
The stronger fix is to aim the floodlight so the brightest part lands below eye level and away from the camera’s direct view.
In many residential setups, the lamp face should not be visible in the camera frame, and the brightest patch should sit on the walking surface, not on the far wall.
Hot spot location beats lumen count
People often underestimate beam aim and overestimate lumens. A 3,000-lumen floodlight aimed at a white fence can damage footage more than a lower-output fixture aimed across the walking zone. More output only helps if the light lands where the camera needs detail.
The point where a routine fix stops making sense is clear: if you have already lowered brightness by 30–50% and the person is still a silhouette, the light position or beam direction is wrong. Dimming alone will not solve a bad angle.
For fixture selection, a controlled low-glare security light usually supports cameras better than a bare wide-beam floodlight; that buying decision fits naturally with Best Outdoor Lights for Security Cameras.
Motion Delay Versus Light Washout
A late clip is not the same as bad exposure
Motion delay and floodlight washout can look similar because both produce poor footage at the moment you need it most. But they fail in different ways.
If the first usable frame already shows the person halfway across the scene, the camera or motion zone may be late. If the clip starts early but the person is dark against a bright surface, the floodlight is the stronger suspect.
A useful threshold: if motion begins at the edge of the frame and recording does not show usable movement until 2–4 seconds later, adjust detection zones, sensitivity, wake settings, or camera placement.
If recording starts within about 1 second but the person remains unreadable, fix the lighting first.
| Footage Signal | More Likely Cause | First Fix to Try |
|---|---|---|
| Person appears late in the clip | Motion delay or poor detection zone | Expand the motion zone toward the entry path |
| Person appears on time but dark | Bright background exposure | Lower or redirect the floodlight |
| Face washes out near the door | Light source too close to lens line | Shield the bulb or move the source out of frame |
| Yard looks bright but details vanish | Excess contrast | Add softer fill, reduce hot spots |
| Image worsens after rain | Reflective pavement or siding | Re-aim away from wet reflective surfaces |
Floodlights can delay recognition
Some cameras need a short adjustment window when a floodlight switches on suddenly. The first second of footage may bloom, pulse, or darken before the exposure settles.
This matters with motion lights because the person may already be near the door, gate, or vehicle by the time the image stabilizes.
If the light turns on only after the person crosses the detection area, the camera may record the worst possible sequence: darkness, sudden glare, exposure correction, then the person leaving the frame.
In that setup, a lower constant light or earlier-triggered softer light may outperform a powerful motion floodlight.
For motion-specific troubleshooting, Outdoor Motion Sensor Light Not Working is useful when the light triggers late, misses the path, or stays unreliable.
Softer Fill Light Usually Beats More Floodlight
Light the approach zone, not the whole yard
The best camera-supporting light is usually steady, shielded, downward, and placed where it gives the subject enough front or side detail. It does not need to make the entire yard look like daytime.
For many homes, the target is a readable approach zone about 6–15 feet from the camera. That might be a gate, driveway edge, back step, side path, or porch landing. If that zone is readable, the far corners of the yard can remain dimmer without hurting the camera’s main job.
This is where softer fill light earns its place. A lower-output wall light, shielded floodlight, or secondary side light can keep faces and clothing readable without creating a giant hot spot behind the subject.
Aim before replacing
The most practical order is: review clips, lower the aim, reduce brightness, narrow the beam, then consider fixture changes. Replacing hardware before testing aim is the classic waste step.
Use this quick field check:
- Review a dry-night and wet-night clip from the same camera.
- Pause the clip when the person is 6–10 feet from the camera.
- Check whether the brightest area is the subject or the background.
- Lower the floodlight until the hot spot leaves the camera’s main view.
- Test again with at least 10 seconds of walking movement, not a still frame.
If the camera view improves after a small aim change, the fixture was not the main problem. If the fixture still throws a hard wide beam into the background after adjustment, then replacement makes more sense.
A good replacement boundary is when the lamp face cannot be kept out of the camera view, the beam cannot be narrowed, or the lowest usable brightness still creates a hot spot. At that point, a shielded low-glare fixture is not a cosmetic upgrade; it is the fix.
For that replacement point, Best Low-Glare Outdoor Security Lights is the better next step than simply buying another brighter floodlight.
What to Fix First
Start with the camera frame
The first priority is keeping the floodlight source and the brightest reflection out of the camera’s main frame. A visible lamp face, white wall, glossy vehicle, or wet driveway can all pull exposure away from the subject.
Do not begin by increasing brightness. That usually expands the same mistake.
Then correct the beam
Aim the floodlight lower and closer to the path. If the fixture has two heads, avoid crossing both beams into the same background surface.
Separate them so one supports the approach zone and the other covers a secondary area without creating a single overbright wall.
A healthier setup has less drama in the frame. The person is readable, the background is not screaming white, and the camera does not need to fight the light every time motion begins.
Finally adjust camera settings
Only after the light is controlled should you tune motion zones, night mode, HDR, exposure compensation, or spotlight behavior. Camera settings should polish the scene, not compensate for a floodlight aimed against it.
The cleanest setup is not the brightest setup. It is the one where the camera can see the subject before the background steals the exposure.
For broader official guidance on exterior lighting efficiency and control, see the U.S. Department of Energy’s Outdoor Lighting guide.