Outdoor LED lights dim over time for different reasons depending on the system. A hardwired porch light or floodlight usually fades because of LED driver wear, heat, moisture, a cloudy lens, or a control issue.
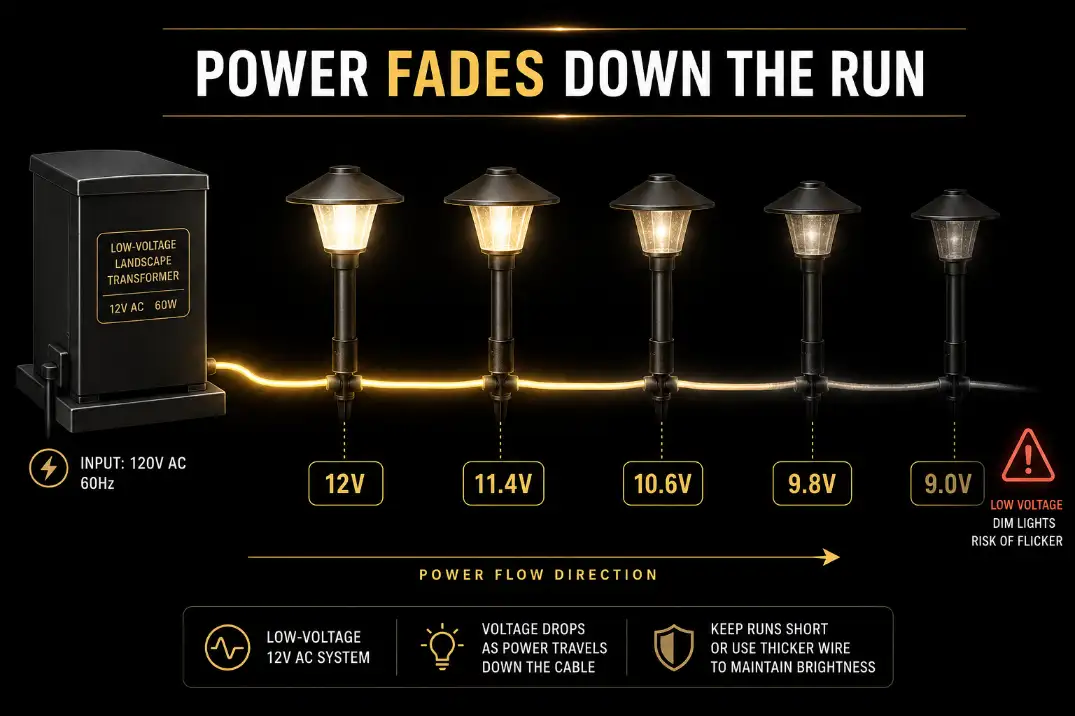
Low-voltage landscape lights often dim because voltage drops before power reaches the last fixtures.
Solar LED lights dim for a different reason altogether: weak batteries, poor charging, shaded panels, or seasonal runtime loss.
The first useful distinction is timing. Gradual, even dimming across similar fixtures over 3–7 years can be normal LED lumen depreciation.
One fixture losing 40–60% of its visible output, dimming after rain, glowing weakly at the end of a cable run, or staying dim only when connected to a sensor, dimmer, timer, or smart switch is not normal aging.
That is usually a fault in the fixture, power path, splice, transformer load, weather seal, or control setup.
First, Identify What Kind of Outdoor LED Light Is Dimming
Hardwired wall lights and floodlights
Hardwired outdoor LEDs are usually 120-volt fixtures mounted on walls, garages, soffits, posts, or security-light brackets.
If they dim over time, the likely causes are LED driver failure, heat damage, moisture intrusion, lens yellowing, a control compatibility issue, or a failing replaceable LED bulb if the fixture uses one.
If your outdoor light uses a replaceable LED bulb, test it with a known-good bulb before assuming the fixture has failed. If it is an integrated LED fixture, dimming usually points to the driver, LED board, lens, moisture, heat, or incoming power instead.
That distinction saves time because a bulb-style fixture and a sealed integrated fixture do not have the same repair path.
The safety boundary matters. Cleaning the lens, checking settings, resetting a breaker or GFCI, and looking for visible water damage are reasonable homeowner checks.
Opening a junction box, testing live conductors, replacing a driver, or repairing damaged wiring is not casual DIY work unless you are qualified.
Low-voltage landscape lights
Low-voltage LED path lights, spotlights, and garden lights usually run from a transformer. They are often safer to inspect, but they are also more sensitive to voltage drop, loose splices, overloaded transformers, undersized cable, and long runs.
A common pattern is simple: the first few lights near the transformer look normal, while the last two or three look weak. That points more strongly to voltage loss than to bad LEDs.
Long 14-gauge runs with many fixtures are more likely to show end-of-line dimming than shorter 12-gauge runs, split runs, or hub-style layouts.
Solar LED lights
Solar outdoor LEDs are their own category. If they dim over time, the usual cause is not house wiring or transformer output. It is battery age, reduced sun exposure, dirty panels, seasonal charging loss, or water damage inside the solar head.
If the problem is mainly weak solar runtime at night, Why Solar Outdoor Lights Fail So Quickly and What’s Really Causing It is the better diagnostic path.
Quick Diagnostic Checklist
Use this before replacing fixtures:
- One fixture dim: inspect lens, driver, seal, bulb, and local connection.
- Several lights dim after rain: suspect moisture or corroded splices.
- End of cable run dim: test voltage at the last fixture while the system is running.
- All low-voltage lights dim: check transformer load, output, timer, photocell, and terminals.
- Dim only on a sensor, dimmer, timer, or smart switch: check control compatibility before replacing the fixture.
- Lens looks yellow or cloudy: clean or replace the cover before blaming the LED.
- Color shifted or patchy: suspect LED board aging, lens discoloration, heat, or driver stress.
- New fixture dims within 30 days: stop replacing parts and inspect the power path.
What Actually Makes Outdoor LEDs Fade
Normal LED lumen depreciation
LEDs rarely fail like old incandescent bulbs. They usually lose output gradually. Many LED products are described by an L70 point, meaning the light has dropped to about 70% of its original output. That does not mean the fixture is dead. It means the fixture may no longer provide enough useful light for a walkway, gate, driveway, or entry.
Runtime matters. A dusk-to-dawn fixture running 10–12 hours per night accumulates about 3,650–4,380 hours per year. A better fixture may handle that for years. A cheap integrated LED with poor heat control may look tired much sooner.
Normal aging is usually even. If four matching fixtures installed at the same time have all softened gradually, age is plausible. If one light collapses in brightness while the others remain strong, something else is happening.
Cloudy lenses and blocked light paths
A dirty lens is not glamorous, but it is one of the few fixes that can restore brightness immediately. Outdoor LED lenses collect pollen, sprinkler minerals, algae, dust, insect debris, and oxidation. Plastic covers can also yellow from UV exposure.
The real mistake is looking only at the glowing fixture face. A lens can still appear lit while the beam reaching the ground is badly weakened. On small path lights, mulch, ornamental grass, or shrubs within 6–12 inches of the lens can also make a working light look weak.
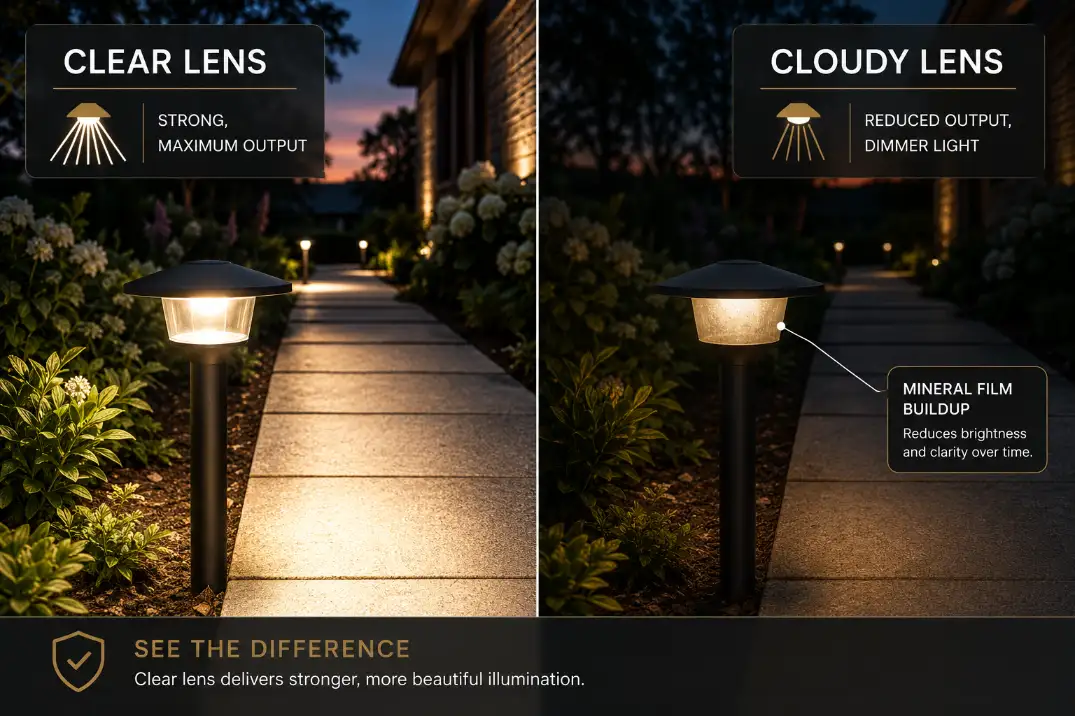
Clean the lens with mild soap, water, and a soft cloth. Do not use abrasive pads on plastic covers. If the lens remains yellow or hazy after cleaning, the cover may be permanently degraded. If the cover is sealed into an integrated fixture, replacement may be more practical than repair.
Moisture that weakens the fixture before it kills it
Moisture is often underestimated because the light may still turn on. Water does not have to flood the fixture to cause dimming.
Vapor inside the housing can corrode terminals, damage the LED driver, cloud the lens from the inside, or create resistance in a splice.
Useful clues include condensation behind the lens, green copper corrosion, white powder on metal parts, rust trails, or dimming that appears after rain or irrigation.
A fixture that improves after a dry 24–48 hour period is not magically fixed. It is giving you a moisture clue.
If dimming follows wet weather across more than one fixture, the problem may be bigger than one light head. Moisture Damage in Outdoor Lighting Explained covers that broader pattern, especially where cable entries, gaskets, or buried connections are involved.
LED driver failure
In many integrated outdoor fixtures, the LED chips are not the first part to fail. The driver often weakens first. The driver converts incoming power into the controlled output the LEDs need. When it starts failing, brightness can drop even though the fixture still turns on.
Driver trouble may show up as delayed startup, dim output that gets worse as the fixture warms, faint buzzing, flicker before dimming, or one fixture aging much faster than identical fixtures nearby.
Heat makes this worse. Dark housings in direct afternoon sun, sealed fixtures under shallow eaves, and poorly vented security lights can run hot enough to shorten driver life.
This is where a routine fix stops making sense. If an integrated fixture has weak output, water marks, heat discoloration, and no serviceable driver or LED module, repeated cleaning or drying is usually wasted effort.
Controls can make a good LED look weak
Not every dim LED is a bad LED. Motion sensors, dusk-to-dawn photocells, smart switches, older timers, and incompatible dimmers can keep an LED from reaching full brightness or create a weak glow when the light should be fully on or fully off.
This is more common with hardwired outdoor floodlights, security lights, and porch fixtures than with simple low-voltage path lights.
If the same fixture works normally on a plain switch but looks weak on a control, the control deserves attention before the fixture does.
A dimmer not rated for LEDs, a sensor with a failing relay, or a smart switch that leaks a small standby current can make the symptom look like LED aging.
The decision rule is simple: if dimming appears only through one control device, test the control path before replacing the light.
Low-Voltage Dimming: The Power Path Matters More Than the Light Head
Voltage drop at the end of the run
Low-voltage LEDs often dim because the farthest fixtures are not receiving enough voltage. A transformer may produce about 12 volts, but a long run with small cable, too many fixtures, weak splices, or poor layout may deliver only 9–10 volts at the end.
That does not always shut LEDs off. It may simply make them weak, uneven, or unreliable. The key is to test voltage while the system is on. Measuring only at the transformer tells you what the system starts with, not what the last fixture receives.
For this pattern, Voltage Drop in Outdoor Lighting Systems is more useful than replacing individual fixtures. The bad-looking light may only be the fixture receiving the worst power.
Transformer overload and control problems
If all low-voltage lights dim at once, do not blame every LED. Look upstream. The transformer may be overloaded, aging, set incorrectly, or feeding too many fixtures for the cable layout.
Loose transformer terminals, failing timers, and photocells can also create weak or inconsistent output.
Raising a transformer tap can sometimes help a long run, but it is not a cure-all. If you raise voltage to help the last fixtures, the first fixtures may receive too much.
That can shorten LED driver life and make brightness uneven. The better fix is often load balancing, shorter runs, heavier cable, or a hub-style layout.
If the issue appears at the power source rather than one light, Transformer Problems in Low Voltage Systems is the stronger next step.
A simple low-voltage test sequence
For low-voltage systems only, test under load:
- Turn the lighting system on.
- Measure voltage at the transformer output.
- Measure at the first bright fixture.
- Measure at the dim fixture.
- Compare the readings.
If the transformer output is normal but the dim fixture is much lower, the fixture is probably not the root cause. If voltage is weak at the transformer, look at load, transformer condition, control devices, and terminals.
Pro Tip: Measure voltage with the lights connected and running. No-load readings can look healthier than the circuit actually performs at night.
The Repair Depends on the Pattern
| What you notice | Most likely mechanism | Why it matters | Best first move |
|---|---|---|---|
| All matching fixtures fade slowly over years | LED lumen depreciation | Usually normal aging | Replace selectively when output no longer serves the area |
| One fixture dims much faster | Driver, lens, moisture, bulb, or local connection | Not normal system aging | Inspect fixture, seal, heat signs, bulb type, and nearby splice |
| Dimming follows rain or sprinklers | Moisture intrusion or corrosion | Replacement may fail again | Dry, reseal, and remake compromised connections |
| Last lights on run are weakest | Voltage drop from run length, load, cable size, or splice resistance | Brighter bulbs will not fix supply loss | Measure voltage at first and last fixtures under load |
| All low-voltage lights dim | Transformer, timer, photocell, overload, loose terminal | Source problem affects the whole system | Check transformer output and load during operation |
| Dim only on a control device | Incompatible dimmer, sensor, smart switch, timer, or photocell | The LED may not be the failing part | Bypass or test the control path safely |
| Light is bright to look at but area stays dark | Aim, obstruction, lens diffusion, or placement | Output may not be the main issue | Clean, clear, re-aim, or reposition |
Fixes That Actually Restore Brightness
Clean, clear, and re-aim before replacing
Start with the fixes that cost little and reveal the real problem. Clean the lens, remove spider webs, trim plants, pull mulch away from low fixtures, and check aim.
A path light tilted 15–20 degrees away from the walkway can look “dim” because the beam is missing the target.
This is also where people overestimate lumens. A brighter fixture in the wrong position can create glare while leaving the step, gate, or driveway edge dark.
If the problem is coverage rather than output, Outdoor Lights Too Bright or Too Dark may fit better than another replacement fixture.
Reseal only when the fixture is still worth saving
If water is inside the fixture, drying it out is only a diagnostic step. Find the leak path: cracked lens, failed gasket, top seam, cable entry, upward-facing angle, or direct sprinkler spray. Replace available gaskets and cracked covers.
Do not trap water inside with random caulk. Outdoor fixtures need to shed water, not become sealed containers with moisture already inside. If water reached a sealed driver or LED board, replacement is usually more reliable than repeated drying.
Remake bad splices instead of taping them
A corroded splice is not a cosmetic issue. Corrosion adds resistance, and resistance causes voltage loss, heat, and dim output. A wet wire nut wrapped in tape and buried in mulch is not a permanent outdoor repair.
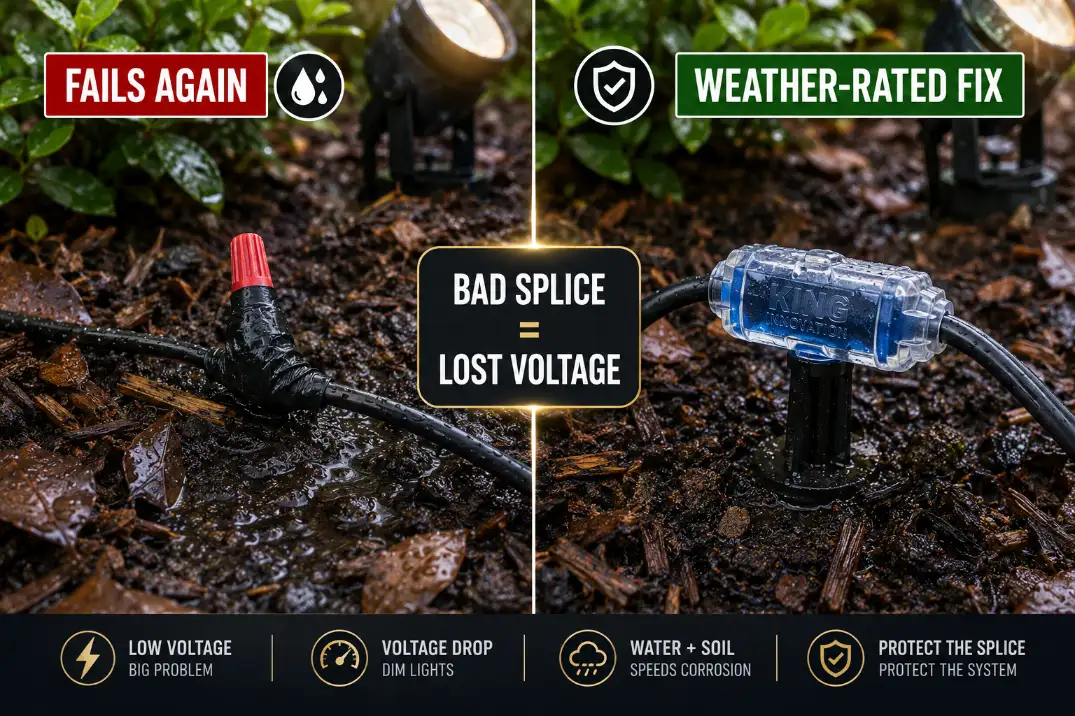
Cut back to clean copper if there is enough wire, use weather-rated waterproof connectors, and keep connections out of standing water where possible.
If several connections show green corrosion or brittle conductors, Corrosion in Outdoor Light Connections is the right repair-focused reference.
Correct the power path instead of overpowering the fixture
For low-voltage landscape lights, the best fix is often not a stronger lamp. Split overloaded runs, shorten long cable paths, move heavy loads closer to the transformer, use heavier cable where appropriate, or redesign the layout so fixtures receive more even voltage.
Raising transformer voltage should be treated as a measured correction, not a guess. If the farthest light is weak because it receives 9.5 volts, raising the tap may help that fixture, but the first fixture on the run may end up overfed. Uneven voltage creates the next failure before it solves the current one.
When Replacement Is the Smarter Fix
Replace the fixture when the LED module is not serviceable, the lens is permanently yellowed, the driver is failing, or moisture has reached sealed electronics. Integrated LED fixtures are convenient, but they leave fewer repair options once the internal parts degrade.
Replace the circuit components when the pattern proves the fixture is not the problem. If a new light dims within 30 days, the issue is probably still in the splice, transformer, cable run, control device, or moisture path.
For security and entry lighting, the decision should be based on useful light, not whether the fixture glows. If a driveway, step, gate, or doorway is no longer clearly visible from the normal approach distance, the light has already failed its job.
Questions People Usually Ask
Can outdoor LED lights be restored to full brightness?
Sometimes. Cleaning a cloudy lens, correcting voltage drop, remaking corroded splices, replacing a bad bulb, fixing a control issue, or stopping moisture entry can restore useful brightness. But if the LED board or driver has aged, cleaning will not bring the fixture back to original output.
Is cold weather the reason outdoor LEDs get dim?
Cold alone is usually not the main cause. LEDs often handle cold better than heat. In freezing climates, the bigger risks are cracked seals, moisture expansion, brittle insulation, and corrosion that appears after winter.
Should I replace dim outdoor LEDs with higher-lumen fixtures?
Only after diagnosis. Higher lumens may help if the original fixture was underpowered, but they will not fix voltage drop, a wet splice, a cloudy lens, bad aim, incompatible controls, or a failing driver. Correct power and placement usually beat simply buying a brighter light.
Why does my outdoor LED look dim only on a motion sensor?
The sensor, photocell, smart switch, or dimmer may not be delivering clean full power to the LED. If the fixture works normally on a plain switch but not through the control, the control path is the more likely cause than LED aging.
For broader official guidance on LED lifetime and efficiency, see the U.S. Department of Energy LED Basics guide.