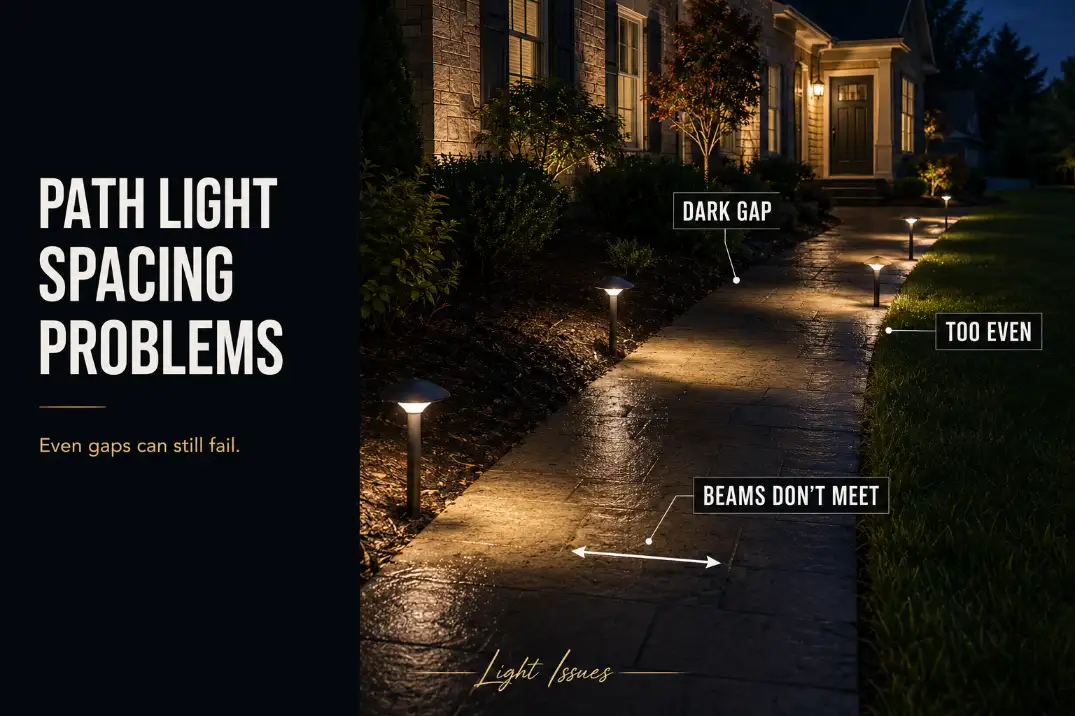
Fix pathway lighting spacing problems by marking the dark walking gaps first, lighting steps and turns second, and adding new fixtures only after the existing lights cannot overlap well enough.
The mistake is treating spacing as a fixed distance, such as every 6 or 8 feet, when the real issue is where the light lands underfoot.
A spacing problem can look like weak bulbs, glare, or voltage drop, but the pattern is different. If every fixture is bright and the walkway still breaks into bright pools and dark gaps, spacing is the likely problem.
If the farthest fixtures are visibly dimmer than the first few, stop moving lights and check the low-voltage run.
A useful threshold is simple: on a main entry path, a dark break longer than about 4–5 feet is usually worth correcting. Smaller shadows are not always failure.
Good pathway lighting does not need to erase every dark spot. It needs to keep the next 2–3 steps readable at a normal walking pace.
Best Fix Order for Pathway Light Spacing
Use this order before pulling up every stake or buying more fixtures.
- Walk the path after full dark and mark the actual dark gaps.
- Fix steps, turns, porch landings, and driveway crossings before straight sections.
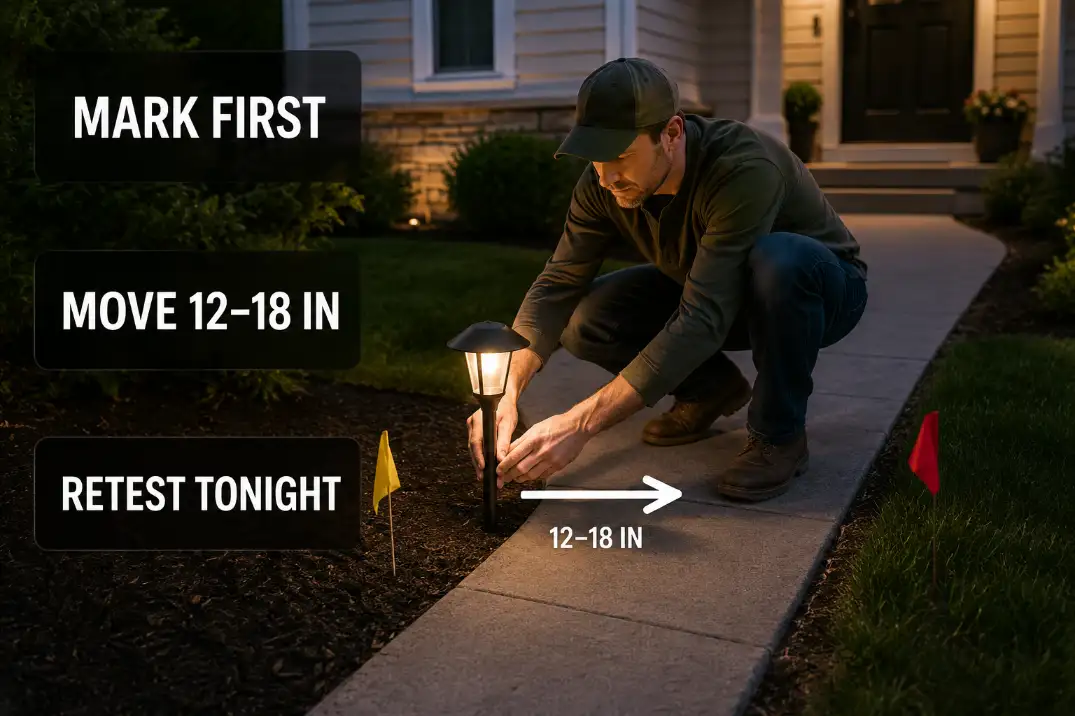
- Move existing fixtures 12–18 inches toward the failed spot before adding another light.
- Stagger opposite fixtures if the path looks too formal or runway-like.
- Stop spacing work if the far end is dimmer than the first fixtures.
That sequence matters because it separates a spacing problem from a power or visibility problem. A dark gap between two bright fixtures usually points to layout. A whole end of the path that fades out usually points to power, load, or cable-run trouble.
Start With What the Light Is Actually Doing
Before changing fixture distance, identify whether the light is missing the walking surface, failing to overlap, or creating glare. These problems can look similar from the porch, but they need different fixes.
Equal spacing is only a starting point
For many low-voltage path lights, a practical starting range is about 6–8 feet apart. Small, low-output fixtures may need closer spacing, around 4–6 feet. Wider, stronger fixtures may work at 8–10 feet. Those numbers are useful for planning, but they are not the final test.
A straight front walk with consistent width may tolerate even spacing. A curved path, narrow side route, sloped walkway, or entry with steps rarely does. The light has to follow the way people move, not the way the fixture row looks from above.
Beam overlap matters more than fixture distance
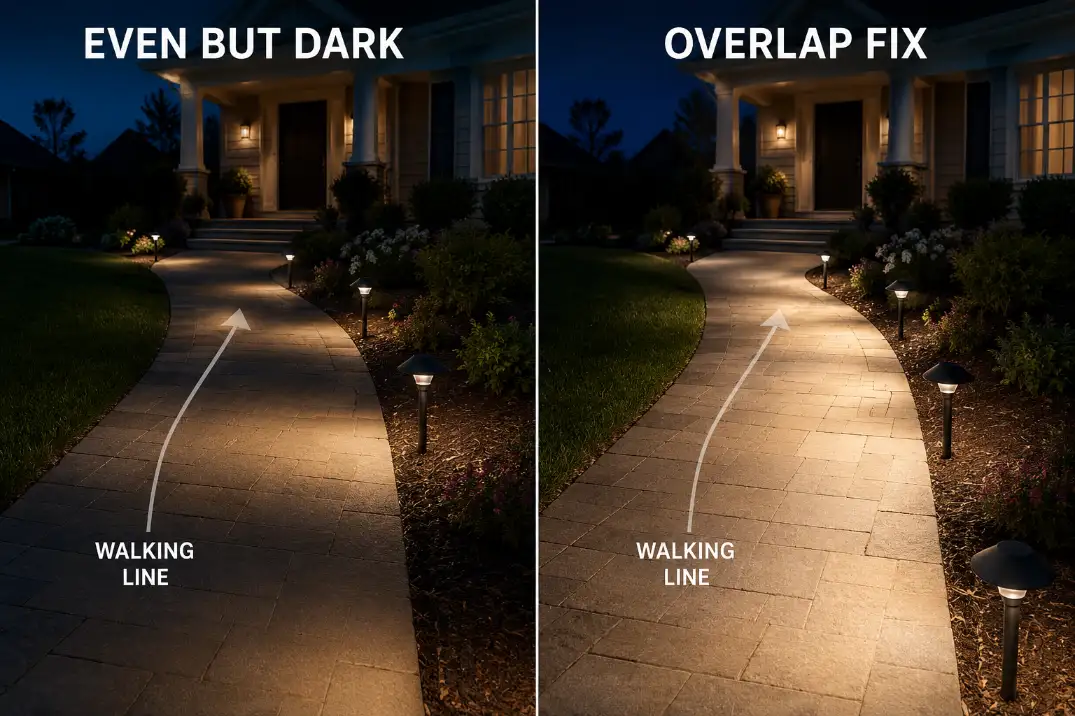
The strongest clue is where each pool of light ends. If one pool fades out before the next begins, the path feels broken even when the fixtures are evenly spaced. If the beam edges meet across the walking line, the path usually feels safer without needing more lights.
A fixture line can look neat while the walking surface stays patchy. This often happens when lights sit too far into mulch or lawn beds.
The head glows, but the beam lights plants, soil, or grass instead of the center of the route. If the fixture is working but the beam is missing the path, the issue may be closer to Path Lights That Shine Into Grass Instead of the Walkway than a simple spacing shortage.
Quick Diagnostic Checklist
Use this checklist before moving fixtures. It keeps you from fixing the wrong problem.
- Dark gaps longer than 4–5 feet appear between bright pools of light.
- Fixture heads glow clearly, but the walkway surface still looks broken.
- Steps, curves, driveway crossings, or porch landings disappear before straight sections do.
- Moving one fixture 12–18 inches would help more than adding a new fixture.
- The path looks better from the yard than it feels while walking on it.
- The far fixtures are not merely darker; the spacing itself creates separate circles.
- The layout looks too symmetrical at night even though it looks tidy during the day.
What People Usually Misread First
The most common wrong fix is adding lights before reading the pattern. More fixtures help only when the existing beam spread cannot cover the route.
If the lights are already bright but landing in the wrong places, adding another head can make the walkway busier without making it clearer.
Dark gaps are a symptom, not the mechanism
A spacing problem creates a repeated sequence: bright pool, dark break, bright pool, dark break. That dark break is the symptom. The mechanism is failed beam overlap across the walking route.
This is different from a fixture failure, where one light or one branch drops out. It is also different from a voltage problem, where the far end of the run may grow weaker.
If your main issue is a broken-looking route between working lights, compare the pattern with Pathway Lights Leaving Dark Gaps Between Fixtures.
Uneven light is not always bad spacing
Some unevenness is normal outside. A garden path does not need to look like an indoor hallway. A small shadow between plantings may be harmless if the walking surface stays readable.
The problem starts when unevenness hides a foot landing, path edge, slope change, or step. A healthier layout gives the eye the next safe target before the previous pool of light ends.
A failing layout makes the walker step into uncertainty. If the fixtures seem random from one section to the next, Pathway Lights That Look Uneven at Night is the closer diagnosis.
| Symptom | More Likely Cause | Better First Fix |
|---|---|---|
| Bright circles with dark breaks between them | Fixtures spaced by distance, not beam overlap | Shift fixtures toward the dark breaks |
| One side of the walkway is lit but the center is dim | Fixtures too far into the bed or aimed outward | Move fixtures closer to the route or adjust the head angle |
| Path looks like an airport runway | Fixtures placed directly opposite or too evenly | Stagger lights and reduce visual symmetry |
| Far fixtures are weaker than the first fixtures | Voltage drop or overloaded run | Check power before changing spacing |
| Step or turn disappears while straight sections look fine | Fixture missing a decision point | Add or move light near the transition |
Fix the Spacing in the Right Order
Do not start by re-spacing the entire run. That usually creates a different version of the same problem. Correct the route in priority order.
First, protect decision points
Decision points matter more than long straight sections. Put your best light coverage near steps, turns, porch landings, gates, driveway crossings, and any place where the walkway edge changes direction.
For most home walkways, a fixture within about 18–24 inches of a step, curve, or landing transition is more useful than perfect 6-foot spacing through a straight bed.
The goal is not to spotlight the feature. The goal is to make the next foot placement obvious before someone reaches it.
Then close the longest dark gaps
After decision points are readable, look for the longest uninterrupted dark gaps. Move the nearest fixture toward the middle of that gap before adding a new one.
A shift of 12–18 inches often changes the result more than expected because low path lights throw their strongest useful light close to the head.
Pro Tip: Move one fixture at a time and test at night before resetting the whole row. Daytime spacing almost always looks cleaner than nighttime spacing performs.
Use a temporary marker before moving the stake
Before pulling a stake, place a small landscape flag, stone, or piece of painter’s tape where the fixture might move. Then test that location after dark.
This avoids tearing up mulch, stressing cable, or moving three lights when one small adjustment would have solved the gap.
If the fixture is hard to move because the cable is tight, stop and check the run layout. A low-voltage path light usually allows small repositioning, but forcing a cable can damage a splice or create a future failure.
Finally, soften the pattern
Once the path is readable, step back and look for rhythm. If every fixture sits directly across from another fixture, the walkway can feel stiff or runway-like. A slight stagger usually looks more natural and gives the walking surface better coverage.
This is where quick fixes often go too far. Pulling every other fixture may reduce the runway effect, but it can bring back dark gaps.
The better move is usually a modest stagger, not a full reduction. If the path feels overly formal or airport-like, the spacing issue is closer to Why Path Lights Look Like a Runway than a simple shortage of lights.
When Adding More Lights Wastes Time
Adding fixtures is tempting because it feels like the direct fix. It only works when the existing fixtures are too far apart for their beam spread.
If the lights are already close but the path still looks harsh, the problem is usually not shortage. It is placement, glare, height, brightness, or beam direction.
Too many fixtures can make the path harder to read
When fixtures are placed too close together, the walkway can become visually noisy. Instead of following a calm route, your eye jumps from one glowing point to the next.
In small front yards, spacing tighter than about 3–4 feet often starts to look cluttered unless the lights are very low output and well shielded.
A path can be bright and still uncomfortable. If the visible fixture heads dominate the scene more than the walking surface, you may need fewer visible points, lower output, or better shielding rather than another light.
Edge placement can turn spacing into a safety problem
Spacing also depends on distance from the walkway edge. Many path lights perform better when placed roughly 12–18 inches from the edge, but the right number depends on fixture height, beam spread, plant growth, and path width.
Too close, and the fixture becomes a trip hazard or gets kicked. Too far, and the beam lands in the bed instead of on the walking surface.
If the fixtures sit tight against the pavement, fix that before fine-tuning the distance between lights. Path Lights Too Close to Walkway Edges explains why edge clearance can matter as much as spacing.
Test the Fix Before Making It Permanent
A spacing fix should be judged from the walking route, not from the porch, driveway, or street. Those views make lighting look better than it feels underfoot.
Test under real nighttime conditions
Turn on the lights you normally use at the same time: porch lights, garage lights, street-facing fixtures, or nearby landscape lights. Wait until full dark, not just dusk. Then walk the path at a normal pace.
If the path is often used after irrigation or rain, test it when the surface is damp. Wet pavers, dark mulch, and glossy stone can change contrast. A layout that looks balanced on dry concrete may create glare or deeper-looking shadows after rain.
Judge the next few steps, not the whole yard
Do not stand over each fixture and evaluate the pool of light. Walk the route the way a guest would. If your eye always knows where the next 2–3 steps are, the spacing is usually doing its job. If you pause near turns, steps, or dark sections, the layout still needs work.
The practical threshold is simple: the walking line should not disappear for more than a few feet at a time on a main entry route. A 4–5 foot dark break near a step, turn, or driveway edge matters more than the same shadow along a decorative garden path.
——————- VISUAL BLOCK ——————-
SECTION PURPOSE:
Test before moving stakes.
IMAGE TYPE:
Realistic Photo + Simple Overlay
AI IMAGE PROMPT:
Realistic Photo + Simple Overlay, 3:2 eye-level dusk scene of a U.S. suburban front walkway with low-voltage path lights and temporary landscape markers beside the path, exact subject is one fixture being tested in a new position before permanent relocation, one dominant action is shifting the light toward a dark gap before moving the stake, must-show details include large readable labels “MARK FIRST,” “MOVE 12–18 IN,” and “RETEST TONIGHT,” one simple adjustment arrow only, realistic walkway with mulch bed, lawn edge, porch light in background, and evening lighting, premium Light Issues editorial graphic with minimal mobile-readable text, 960×640, 3:2 landscape, WEBP under 100KB
ALT TEXT:
Pathway light temporarily marked for a 12 to 18 inch spacing adjustment before retesting the walkway at night.
—————– VISUAL BLOCK END —————–
When Spacing Is Not the Real Problem
Spacing changes should stop when the pattern points to power, glare, or fixture control instead of distance. Moving lights cannot fix weak output, harsh visible glare, or an overloaded low-voltage run.
Check for far-end dimming before moving fixtures
If the first few fixtures look normal and the last few look weaker, spacing may only be exposing a power issue. This is common after adding fixtures to an existing low-voltage run. The path may look like it has dark gaps, but the real cause is lower output near the end of the line.
In that case, review Why Landscape Lights Get Dimmer After Adding Fixtures before changing the layout. A spacing correction cannot compensate for fixtures that are not receiving enough usable power.
Separate glare from spacing
Glare can masquerade as spacing failure. A bright fixture head can make the area around it look darker by contrast. The path may seem uneven not because the fixtures are too far apart, but because the visible source is too harsh.
If the walkway feels uncomfortable even where it is bright, the fix may be shielding, lower output, or a different fixture style. Do not keep tightening the spacing if every added fixture creates more glare than guidance.
Know when to stop DIY changes
Small low-voltage repositioning is usually a layout task. Hardwired fixtures, damaged buried cable, repeated transformer overloads, tripping GFCI protection, or lights that fail after moving a splice are different problems. At that point, spacing is no longer the main repair.
The stopping point is when each added fixture creates more visible hardware than useful guidance. A good path does not need to be evenly bright from edge to edge.
It needs a calm sequence of safe targets that makes the route readable without turning the walkway into a row of glowing dots.
For broader outdoor lighting guidance on glare, direction, and responsible nighttime visibility, see DarkSky International’s lighting principles.